The Complete Guide to Flashing Factory Images on Android Using Fastboot
The Complete Guide to Flashing Factory Images on Android Using Fastboot
If your phone's bootloader is unlocked, you can flash factory images using Fastboot commands. That may sound like a lot of technical jargon, but when it comes down to it, this is the best method for updating a rooted device, repairing a bricked phone, reverting to stock, or even receiving new Android updates ahead of the general public.
Fastboot, like ADB, is a highly capable Android utility that accepts commands via a terminal shell. However, if that sounds intimidating, have no fear—once you've mastered the basics, you'll gain a wealth of knowledge about the inner workings of Android, as well as how to resolve the majority of common issues.
A Note About Samsung Devices
The procedure outlined below will work for the majority of Nexus, Pixel, HTC, and Motorola devices, as well as many other manufacturers' smartphones and tablets. Samsung devices, on the other hand, use their own firmware flashing software, so Fastboot is not a viable option if you own a Galaxy. Rather than that, it is preferable to use Odin to flash firmware on a Samsung device, which we have covered in detail at the following link.
1. Install ADB & Fastboot on Your Computer
To begin, install ADB and Fastboot on your computer. These are the utilities that enable you to flash images via Fastboot commands. Third-party developers have created several "one-click" and "light" versions of ADB and Fastboot, but I would avoid using them because they are not updated as frequently as the official utilities, and thus may not be fully compatible with newer devices.
Rather than that, your best bet is to download from Google either the Android SDK Tools, which includes ADB and Fastboot, or just ADB and Fastboot. Whether you opt for the full package or just the platform tools, they are authentic. The installation process for Windows, Mac, and Linux is detailed in Method 1 of the following guide, so head over there to get started.
2. Enable OEM Unlocking
To use Fastboot to flash images, your device's bootloader must be unlocked. If you've already completed this step, proceed to Step 3.
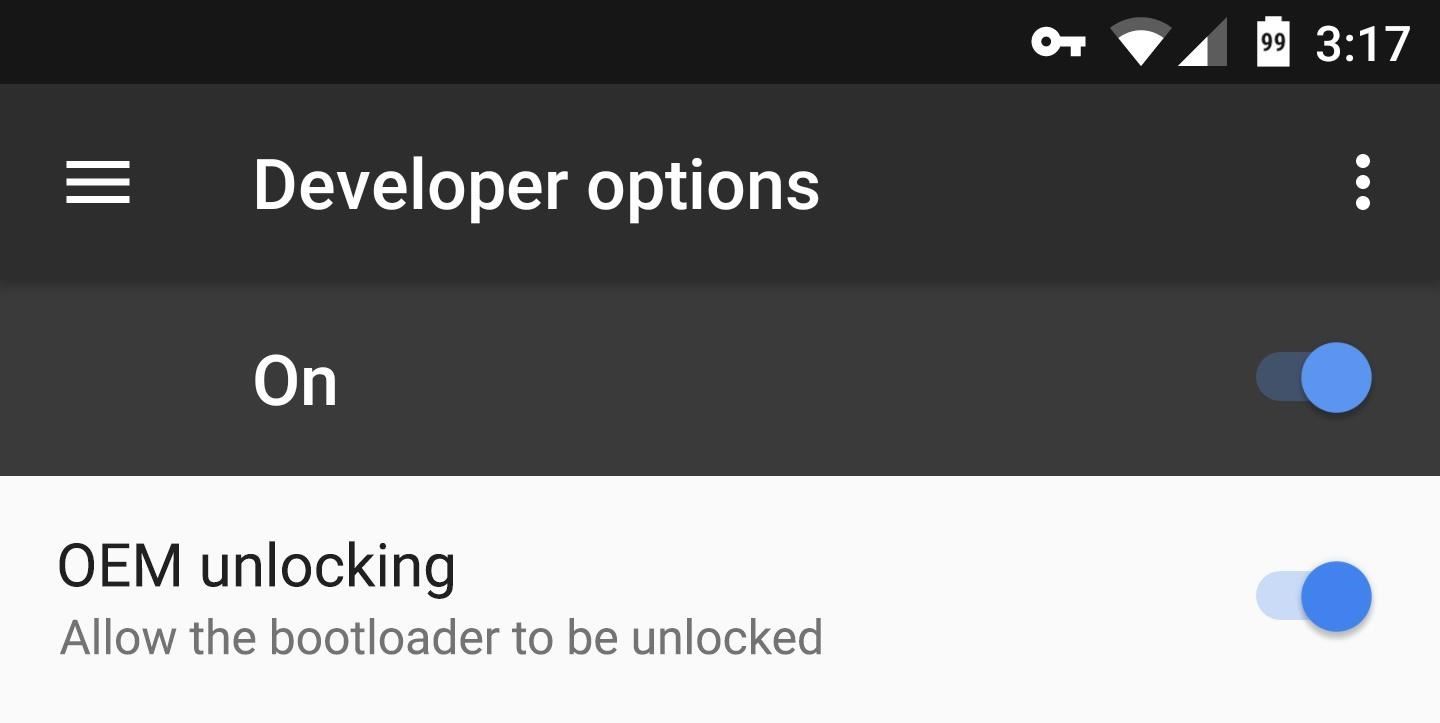
However, before you can unlock your bootloader, you must enable a setting if your device came preinstalled with Android Marshmallow or higher. To begin, enable the Developer options menu on your phone or tablet. After that, open the Developer options menu and toggle the switch next to "OEM unlocking."

If this option is not available on your device, it is likely that your device did not come pre-installed with Android Marshmallow or higher. However, if the option is present but grayed out, this typically indicates that your bootloader cannot be unlocked, preventing you from flashing images via Fastboot.
3. Put Your Phone into Bootloader Mode
To execute any Fastboot commands, you must be in bootloader mode on your phone or tablet. This procedure varies according to your device.
For the majority of phones, begin by completely powering down the device. When the screen goes black, simultaneously press and hold the volume down and power buttons for approximately 10 seconds.
If that fails, turn off the phone and press and hold the volume down button. From there, simply connect a USB data cable to your PC and wait a few seconds.
If that does not work, repeat the USB cable method using the volume up button.
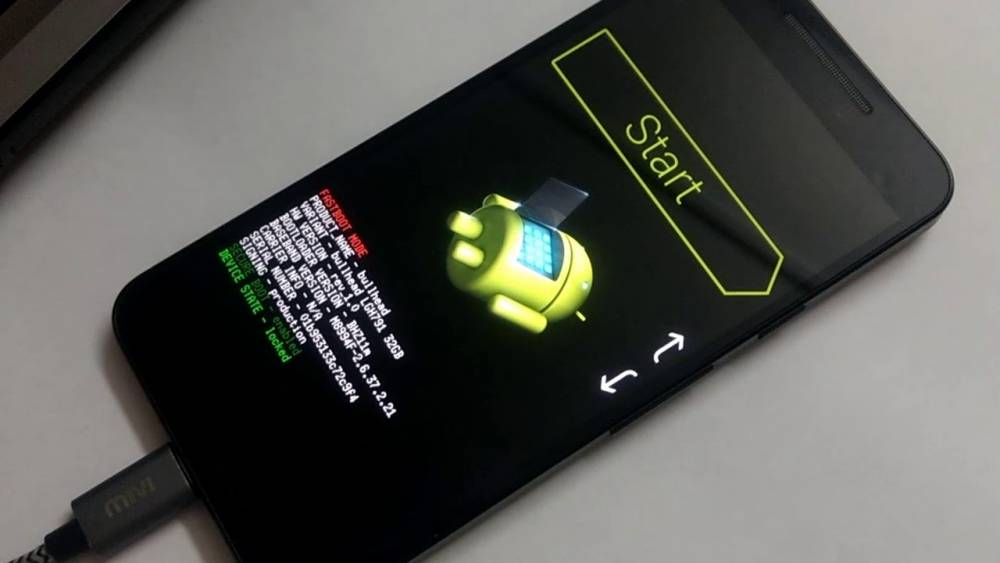
Within a few moments, you should see Android's Bootloader menu, which looks like this:

When this screen appears, ensure that your phone or tablet is connected to your computer via a USB data cable. Apart from that, leave the device alone; the remainder of the work will be completed via the computer.
4. Open an ADB Shell on Your Computer
Navigate to the directory where ADB and Fastboot were installed on your computer. This is typically located at C:Program Files (x86)Androidandroid-sdkplatform-tools for Windows users. For Mac and Linux users, the location of the ADB folder depends on where you extracted it during the utility's installation, so search your hard drive for the platform-tools folder if you've forgotten.
If you're using a Windows PC, hold down the shift key while right-clicking any empty space and selecting "Open command window here." For Mac and Linux users, simply open a Terminal window and change directories to your ADB installation directory's platform-tools folder.

5. Unlock the Bootloader
This is a one-time task, so if your bootloader is already unlocked, you can skip ahead. Otherwise, you'll need to execute a single Fastboot command—but keep in mind that this will wipe your device's data.
Before we begin, please note that I will be listing the commands for Windows users in this section. Before each of these commands, Mac users must add a period and a slash (./), while Linux users must add a slash (/).
Therefore, from the ADB shell, enter the following command:
fastboot devices
If this returns a series of letters and numbers followed by the word "fastboot," your device is properly connected and you can proceed. Otherwise, return to Step 1 and verify that ADB and Fastboot are installed correctly, as well as that your device is in bootloader mode, as demonstrated in Step 3.

Following that, you'll need to unlock your bootloader. This will be accomplished in one of two ways, depending on the Android version shipped with your device.
Therefore, if your device came pre-installed with Lollipop or a lower version of Android, run the following command:
fastboot oem unlock
If your device came pre-installed with Marshmallow or higher, enter the following command:
fastboot flashing unlock

At this point, your Android device will prompt you to confirm that you want to unlock the bootloader. Ascertain that the "Yes" option is highlighted, or use your volume keys to do so. From there, press and hold the power button until the bootloader unlocks and the phone reboots into Fastboot mode.

6. Download the Factory Images
After unlocking the bootloader, you're ready to begin flashing factory images—but first, you'll need to download the images themselves.
7. Flash the Factory Images
The images are now ready to be flashed. To begin, extract the factory images archive that you downloaded from your manufacturer's website.

Following that, extract the archive's contents to the platform-tools folder within your ADB installation directory, and then open an ADB Shell window in this folder. Refer to Step 4 above for additional information.


