How to Password Protect Your USB Drive: 8 Easy Ways
How to Password Protect Your USB Drive: 8 Easy Ways
This article discusses the most straightforward methods for password protecting or encrypting files and folders on a USB flash drive.
Create an Encrypted Partition on the Rohos Mini Drive
Numerous tools are available to encrypt and password protect your data. However, the majority of them require administrator privileges to run on any given computer. However, the Rohos Mini Drive works regardless of whether you have administrator rights on the target computer. The free edition allows you to create a hidden, encrypted, and password-protected partition on your USB flash drive of up to 8GB. Automatic on-the-fly encryption with AES 256-bit key length is used by the tool.
The portable Rohos Disk Browser, which you install directly to your flash drive, eliminates the need for local encryption drivers. Following that, you can access the protected data from any location.
From the Rohos Mini Drive start screen, click Encrypt USB drive, select the drive, enter a new password, and click Create disk. This will create a container on your external drive that is password-protected and encrypted.

The protected container can be accessed by double-clicking the Rohos Mini.exe icon located in the root folder of your USB thumb drive. The Rohos disk will mount as a separate drive after you enter the password, and you can access it via File Explorer.
To disconnect from your Rohos partition, right-click the Rohos icon in the Windows Taskbar notification area and select Disconnect from the menu that appears.
Create a SafeZone on Your USB Drive with SecurStick
This utility was developed by the German computer magazine c't. It requires no installation and works with Windows, Linux, and Mac without requiring administrator rights. However, in order to configure it, you must run an EXE file from the flash drive you wish to encrypt.
To install SecurStick, first download and unpack the ZIP archive, then copy the EXE file to your USB flash drive. When the EXE file is executed, a command prompt and browser window are opened. To install the Safe Zone, enter a password and click Create.
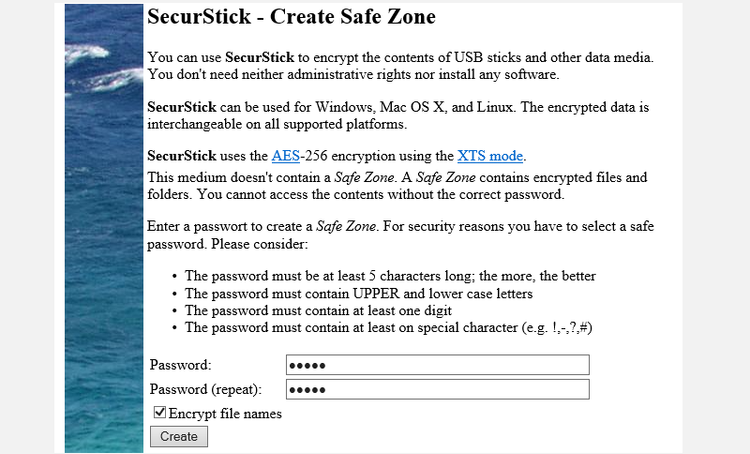
When you run the SecurStick EXE file again, you'll see a login window. By logging in, the Safe Zone is activated. Any files you copy into the SafeZone are encrypted automatically. Please keep in mind that closing the command prompt window terminates your Safe Zone session.
The simplest way to remove SecurStick completely from your flash drive is to format it.
VeraCrypt: Protect Your Entire Flash Drive with Encryption
VeraCrypt is TrueCrypt's successor. It is distributed as a portable application that can be run directly from your flash drive. However, it is worth noting that VeraCrypt does require administrator privileges to function. It employs AES 256-bit encryption on-the-fly. The free version is limited to 2 GB drives.
VeraCrypt encrypts data on-the-fly using a variety of different encryption algorithms, including 256-bit AES, Serpent, and TwoFish, as well as combinations of these. As with the Rohos Mini Drive, it can create an encrypted virtual disk that mounts just like a physical disk. However, you can encrypt whole partitions or storage devices as well.
Download and install VeryCrypt Portable on your USB drive. When the portable application is launched, it displays all available drive letters. To create a volume, select one and click Create Volume. This command initiates the VeraCrypt Volume Creation Wizard.
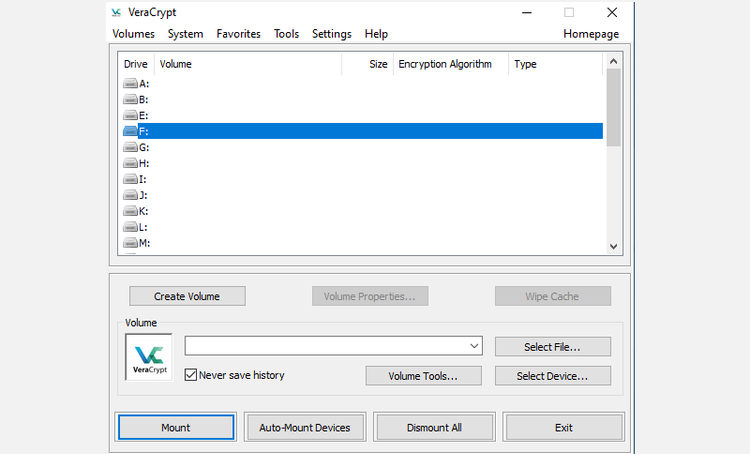
To encrypt your entire USB flash drive, click Next and then select Encrypt a non-system partition/drive.
The following step allows you to select either a Standard or a Hidden VeraCrypt volume. By utilizing a hidden volume, you mitigate the risk of being compelled to reveal your password. Take note that if you want to create a Hidden VeraCrypt volume, you must format the entire USB drive.
We'll begin with the VeraCrypt Standard volume. Select Device in the next window, select your removable disk, confirm with OK, and click Next.
To encrypt the entire USB drive, click Next and then select Encrypt partition in place. VeryCrypt will warn you that you should have a backup of your data in case anything goes wrong during the encryption process.
Select the Encryption and Hash Algorithm options; you can leave the defaults alone. Following that, you'll be able to configure your Volume Password. The following step will determine the encryption's cryptographic strength based on your random mouse movements.
Now, select your Wipe Mode; the more wipes you have, the safer you are. To begin the encryption process, click Encrypt in the final window.
How to Encrypt Your Flash Drive on a Mac
If you're using a Mac, you can encrypt your USB flash drive without using a third-party tool.
To begin, the flash drive must be formatted with Apple's HFS+ file system. Take note that this will delete all files on it, so you should make a backup. Select your flash drive and click Erase in the Disk Utility app. In the popup window, select Mac OS Extended (Journaled) as the file format and click Erase in the bottom right to format the drive.
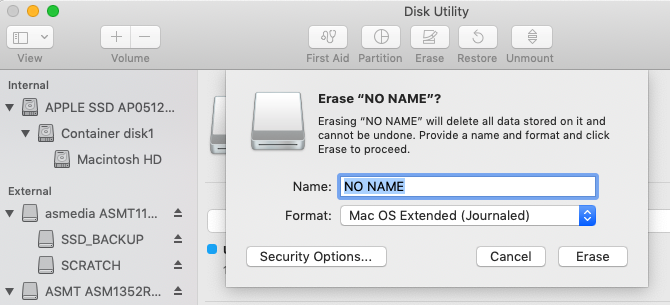
After completing the preceding steps, you are prepared to create an encrypted flash drive. Simply right-click the drive in Finder and choose Encrypt, followed by a password. The process begins immediately and should take no more than a few minutes, depending on the size of your USB stick. You'll have an encrypted and password-protected USB drive in no time.
Use 7-Zip to Create a Password Protected Archive
AES-256 encryption and password protection are also supported by archive tools such as 7-Zip.
After installing and running 7-Zip, right-click a file or folder on your USB drive and choose 7-Zip > Add to Archive. Select the Archive format and enter a password in the Add to Archive window. To begin the archiving and encryption process, click OK.
Save Individual Files with a Password
As mentioned previously, without using encryption, you cannot safely password protect your entire USB stick. If, on the other hand, you only need to protect a few selected files, you can simply save them with a USB password.
Numerous programs, including Word and Excel, allow you to encrypt files.
For instance, while the document is open in Word, navigate to File > Info and expand the Protect Document menu. After that, choose Encrypt with Password.
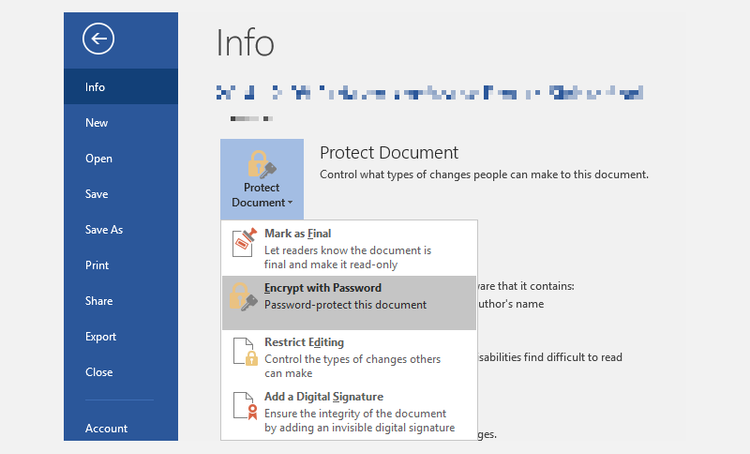
After completing the preceding steps, enter your password and confirm it to secure your document. Finally, save your work and make a note of the password.
PDFTK Builder, which is also available as a portable app, can be used to password protect PDF files on your USB flash drive.
Password Protect Your USB Drive with WinRAR
WinRAR is a freeware file archiver for Windows. As with WinZip, it is useful for compressing large amounts of data.
However, it can be beneficial in terms of data protection. This is especially true if you're encrypting individual files or folders rather than an entire USB stick.
Select Add to archive from the context menu of the folder you want to encrypt. Set the name of the new file in the General tab of the next window, select RAR as the archive format, and click on Set password. Set a password in the next window, check the Encrypt file names radio box, and click OK.
Your newly created.rar file will be created shortly and will require a password to open.
Conclusion
You now know how to password-protect a flash drive on Windows, Mac, and Linux. And hopefully, this brief guide helped you secure your USB stick with a password.
If you're concerned about your USB stick becoming corrupt and you losing all of your data, consider backing up your documents using cloud software as well.
Courses and Certification
Computer Engineering Course and Certificate
Computer Fundamentals Course and Certificate

