Guide To Create Multiple Partitions In USB Drive!
Guide To Create Multiple Partitions in USB Drive!
External hard drives enable you to backup critical data, transfer it between computers, and protect it against significant data loss. When you purchase a USB Hard Drive, it is initially formatted as a single partition. However, some users partition their drives in order to better organize their files and folders. Partitioning the hard drive allows for the division of space into distinct segments, each of which can be used for a distinct purpose.
With the proliferation of multi-terabyte external hard drives, partitioning enables the conversion of a single drive into a multi-drive functionality device with ample space on each partition.
Therefore, if you've recently purchased a new USB Hard Drive or Memory Card and wish to split it, simply follow this simple guide on how to 'create multiple partitions in USB Drive' and maximize the capacity of your external hard drive!
Here’s How to Partition USB Drive on Windows 10?
The newly purchased USB Drive is already partitioned and formatted in a single large partition. To improve data management, you can partition the drive into two or more partitions. Discover how to make one:
Note: To ensure that no data is lost during the partitioning process, create a backup of all your files and folders.
Partition USB Drive Via Disk Management Utility
The simplest and most straightforward method of partitioning your hard drive is to use Windows' built-in Disk Management tool.
1. Connect the external hard drive to your system via USB.
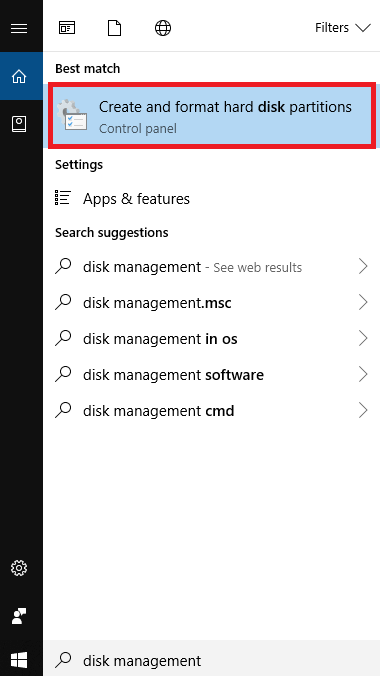
2. To access the Disk Management utility, type 'Disk Management' in the Windows search box > click the first result, 'Create and format hard disk partitions,' and then select the hard drive to split.

Additionally, you can open Disk Management by navigating to Control Panel > Administrative Tools > Computer Management > clicking on Disk Management on the left-hand side under the Storage heading. On your screen, a list of all existing and external drives will be displayed.
3. Right-click the disk on which you want to create a partition and select the 'Shrink Volume' option.
4. Before you can split the drive, you'll need to create some 'Unallocated space,' so once the Shrink Volume box appears, enter the amount of space you'd like to allocate > and click the 'Shrink' button.

5. Next to all existing drives, a new 'unallocated' space will be displayed. Right-click it and choose 'New Simple Volume'.

6. Follow the on-screen instructions and enter the size of the new partition.

7. When partitioning, it is a good practice to format both the new and old drives. Therefore, when the format option is presented, use it.

8. Continue clicking the 'Next' buttons, specify the volume size for the new partition, and finally click 'Finish' to create the new partition.


That's it! A brand-new USB Drive partition has been created!
ImageSource: WTG

