How To Turn Off The Visual Effects In Windows 11
Using Windows 11, you can turn off all visual effects to improve system performance and battery life while also improving the overall feel of the experience.
In the Control Panel, follow these steps to turn off all visual effects at the same time:
1. Go to the Control Panel and click on it.
2. From the drop-down menu, select System and Security.
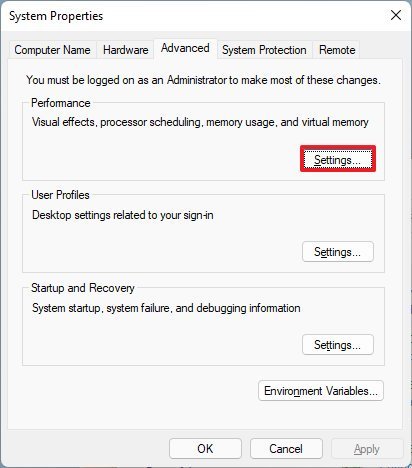
3. In the "System" section, select the Allow remote access option to bring up the legacy System Properties window.

4. Select the Advanced tab from the drop-down menu.
5. In the "Performance" section, select the Settings button.
6. From the menu bar, select the Visual Effects tab to begin working.
7. Select the Optimize performance option from the dropdown menu.
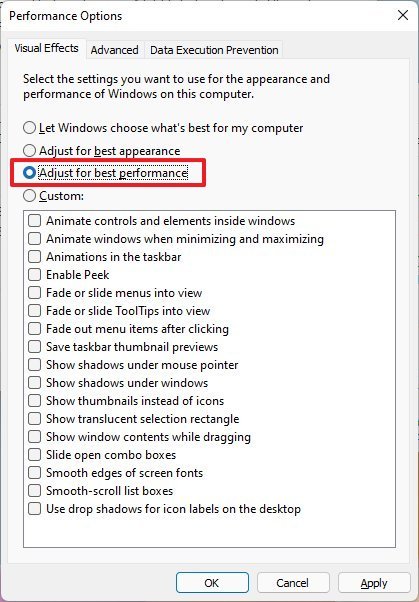
Please keep in mind that if you select this option, the system will disable the fancy font rendering functionality. Smooth edges of screen fonts can be viewed by selecting Custom, clearing all other options, and checking the Smooth edges of screen fonts option.
8. Select the Apply button from the drop-down menu.
9. Finally, press the OK button to confirm your actions.
Following completion of the steps, all animations for controls and elements, window minimization and maximization, and taskbar animations will be turned off. Additionally, this option disables the fade and slide effects for menus and tooltips, as well as the shadow and translucent effects, as well as the clear type option for fonts, among other features.

