How To Add A Drop-Down List To A Word Document
Make sure that the Developer Menu is active
One can add a drop-down list by selecting the corresponding option from Word's Developer menu. This menu is set to be hidden by default; in order to add a list, you will need to enable it first.
To get started, launch Word on your computer, either using Windows or a Mac. Choose "Options" from the menu that appears in the window's lower-left corner. The "Options" command can be accessed by selecting the "File" menu item if the current document is already open.

Choose "Customize Ribbon" from the left sidebar of the "Word Options" window that appears after clicking the button.

In the "Customize Ribbon" pane located on the right side of the screen, scroll down the list until you find the "Developer" option, and then enable it.

Simply clicking the "OK" button at the bottom of the window will close the window.
Add a Drop-Down List to a Word Document
You are now able to add a drop-down list to your Word document after having first added the Developer menu to it. To get started, either launch an already existing Word document or create a brand new document.
Put the insertion point exactly where you want the drop-down menu to appear in the document you're working on.

Next, select the "Developer" menu from the drop-down list.

Choose the "Drop-Down List Content Control" icon that can be found in the "Controls" section of the "Developer" menu (It looks like an actual drop-down icon).

Your document has been updated to include a drop-down menu.

Configure Your New Drop-Down List
At the moment, this drop-down menu is not configured and has no items in it. Simply make your selection from the drop-down menu to begin configuring it and adding items to it. Click "Properties" in the "Controls" section of the Developer menu to access the settings for the control.

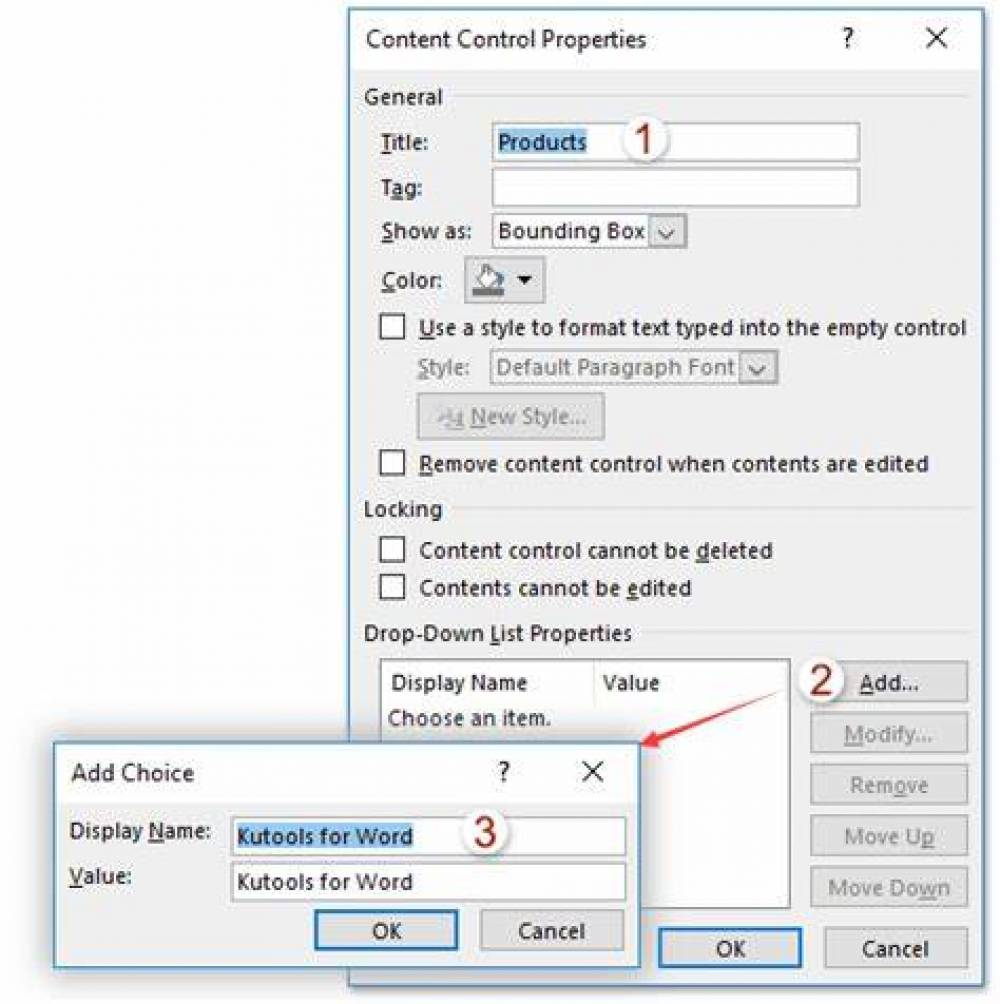
The Content Control Properties window will be displayed when you use Microsoft Word. To get your list started, start by entering a title. The drop-down menu will begin with this option selected by default.

Note: That Word will automatically fill in the "Tag" field with the same value that was entered into the Title field. Within the XML structure of a document, the tag representing a content control object is most commonly utilized by other applications in order to identify content control data. Ignore the tag unless you are developing document automation and have a particular need to set it. In that case, you should pay attention to it.
Utilizing the "Color" option will allow you to select a color scheme from the drop-down list.

Users will not be able to make changes to your drop-down menu if you enable the option that says "Content control cannot be deleted." It is important to keep in mind, however, that unless your document is locked, anyone can turn off this option.

Now you will add items to your drop-down menu. In the "Drop-Down List Properties" section of the current window, click the "Add" button. This will allow you to add your first item.

Enter the new name of the item you want to add into the "Display Name" field of the "Add Option" window. You do not need to be concerned about the "Value" field because it is automatically populated with the information that was taken from the first field.
After that, you should hit the "OK" button to add the item. Follow these steps again for each option that you want to include in the drop-down menu you've created.

You are able to rearrange the items in your cart after adding multiple ones. After selecting an item from the list, you can alter its position in the list by clicking "Move Up" or "Move Down" on the right side of the screen.

To save your changes, you will need to click the "OK" button.

Your menu with drop-down options will now include the items that you just added. You can judge for yourself by clicking the button.

Delete a Drop-Down List from Microsoft Word
To delete it from the document, select it from the list that drops down. After that, select "Properties" from the "Controls" menu at the very top of the screen. Click "OK" at the bottom of the page after you have deactivated the option that says "Content control cannot be deleted."

By using your right mouse button, you can select "Remove Content Control" from the document's drop-down menu. Next, items on the list will be crossed off.

And this is how you provide people with predefined selection options in the documents you create using Word!

