How To Add Check Boxes To Word Documents
Using checkboxes in Microsoft Word to create questionnaires or forms makes the options simpler to read and more intuitive to respond to. In order to accomplish this, we will examine two possible approaches. The first alternative is recommended for use with Word documents that you intend for other people to digitally complete. The second choice is the better one to go with if you want to be able to print out documents like to-do lists.
Option 1: Utilizing Word's Developer Tools, you can incorporate the Check Box Option for Forms
In order to create fillable forms that include check boxes, it is necessary to enable the "Developer" tab that is located on the Ribbon. After opening a document in Word, go to the "File" menu and make a selection from the drop-down menu labeled "Options." In the window labeled "Word Options," navigate to the tab labeled "Customize Ribbon." Choose "Main Tabs" from the menu that appears when you click the drop-down arrow next to "Customize the Ribbon" on the list that is located on the right.

After making your selection in the "Developer" main tab in the available list of main tabs, click the "OK" button.

Your Ribbon now contains an additional tab labeled "Developer." Simply move the cursor to the location in the document where you want the check box to appear, click the "Check Box Content Control" button located on the "Developer" tab, and then click the "OK" button.

At the location where you have placed your cursor, a checkbox should appear. You'll notice that a checkbox has been positioned next to each answer in this area, and as you can see, those checkboxes allow for user input. To move the check box, format it, or any of the other options, click a box to mark it with a "X" (as we’ve done for answer 1), or select the entire form box (as we’ve done for answer 2) to do so.

Option 2: Change Bullets to Check Boxes for Printed Documents
If you are creating a document for printing, such as a to-do list or survey, and all you require are check boxes, then you do not need to add Ribbon tabs or use forms. You could, alternatively, make a straightforward list using bullet points, and then change the default symbol to be check boxes.
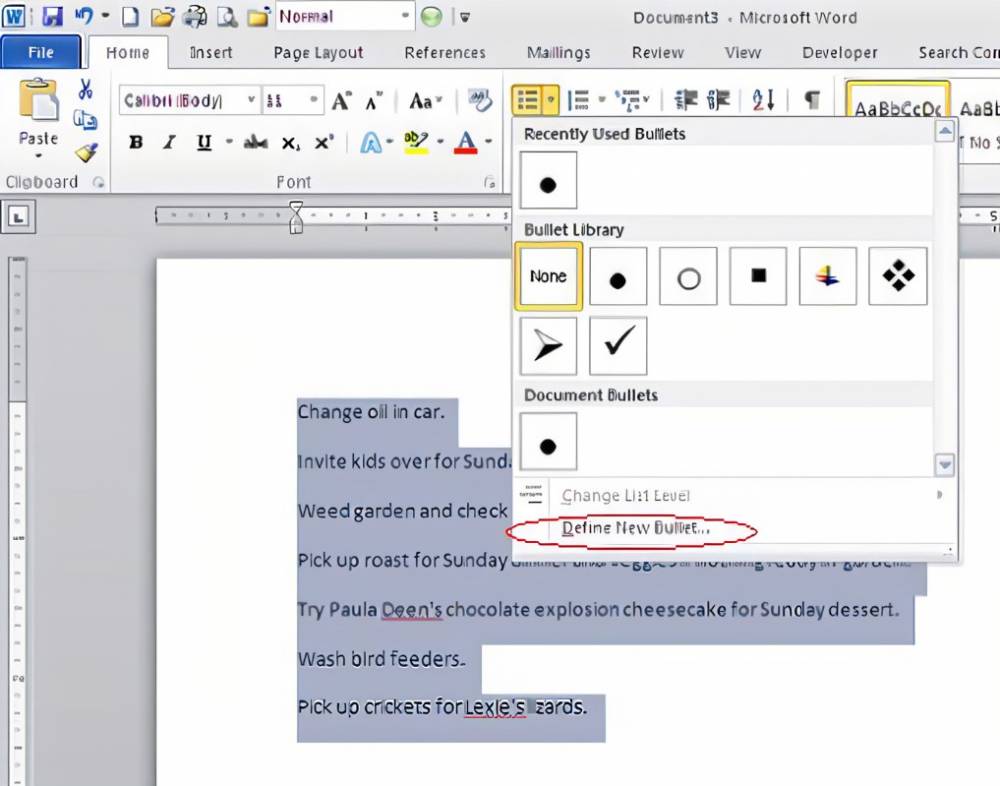
Click the tiny arrow that is located to the right of the "Bullet List" button that is located on the "Home" tab of your Word document. Choose "Define new bullet" from the list of available commands on the menu.

Choose "Symbol" from the list of available options in the "Define New Bullet" window's drop-down menu.

Choose "Wingdings 2" from the drop-down menu located in the "Font" section of the "Symbol" window.

You have the option of scrolling through the symbols until you find the empty square symbol that resembles a check box, or you can type "163" into the "Character Code" box to automatically select it. Naturally, you are free to go with a different symbol altogether if you come across one that appeals to you more, such as the open circle (symbol 153), for example.
Click "OK" to close the "Symbol" window after you have chosen your symbol, and then click "OK" again to close the "Define New Bullet" window.

You can begin typing in your bulleted list now that you have returned to Word. The checkboxes are displayed wherever a bullet point would normally be expected to appear.

The following time you need the check box icon, you won't have to go through all of those windows because it will be easier for you to find it. Simply click the small arrow that is located to the right of the "Bullet List" button once more, and the checkbox will appear under "Recently Used Bullets."

It bears repeating that you can only use this method for documents that you intend to print. Because the checkbox symbols in a Word document are not interactive, you are unable to select them to mark something as complete.

