How To Create A Table Of Contents In Microsoft Word
How to Create a Table of Contents in Microsoft Word
Step 1: Using the built-in heading styles, you can create a document that is professional in appearance
To quickly and easily insert a table of contents into a Word document, you must first apply heading styles to the document's titles and subheadings before proceeding.
In order to apply a built-in heading style to a title or subheading, complete the following steps:
1. To apply a built-in heading style to a title or subheading, select the title or subheading and click on it. In this case, each title or subheading is a paragraph in its own right, and each paragraph should be terminated by a hard return (you pressed Enter or Return).
2. The Home tab and a heading style in the Styles group can be found on the Ribbon (such as Heading 1).
However, although it is common to have one or two levels of headings (Heading 1 and Heading 2), it is possible to have multiple levels of headings.
Additional options include selecting a title or subheading and pressing Ctrl + Alt + 1 for Heading 1, Ctrl + Alt + 2 for Heading 2, and so on for each successive heading level.
Step 2: You will create the table of contents. (custom vs. manual)
Once you've applied the built-in heading styles, you can quickly and easily create a custom table of contents, also known as a TOC.
In order to create a custom table of contents (as opposed to a manual one) that does not appear in a content control, follow these steps:
1. Select the location in the document where you want to insert or create a table of contents (typically at the beginning of the document).
2. After you've typed "Contents" or "Table of Contents," hit the Enter key. Format the text as you see fit, but avoid using the built-in heading styles if at all possible.
3. In the Ribbon, select the References tab and then the Table of Contents group to begin editing. A drop-down menu appears on the screen.
4. Select Custom Table of Contents (for versions 2013 and later) or Insert Table of Contents (for versions 2013 and earlier) (2010). Create a custom or manual table of contents for your document to ensure you have complete control over what is included and how the table of contents is presented. A dialog box appears on the screen.
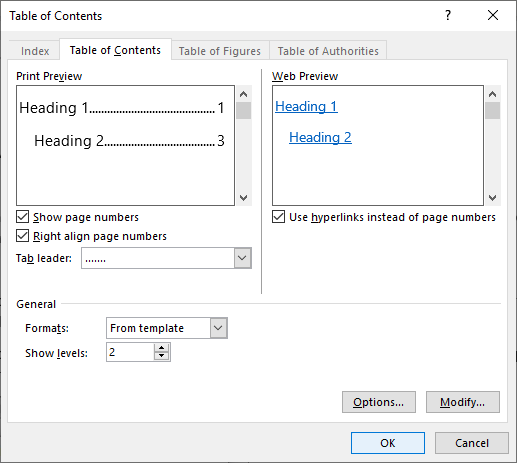
5. Enter the number of levels to be displayed in the table of contents next to the Show levels option (such as 2).
6. Press the OK button to confirm your action. The table of contents is included in the document. It is normal for this field to appear in grey when you first click in it because it is a Word field. The table of contents should not contain any entries that were manually entered.
The following is an example of the Table of Contents dialog box:
Step 3: The table of contents should be formatted
The Table of Contents dialog box allows you to format a custom or manual table of contents in a variety of ways, including the following options:
1. Locate the appropriate chapter in the table of contents.
2. Select the References tab, followed by the Table of Contents group, from the Ribbon menu bar. A drop-down menu appears on the screen.
3. Select either Custom Table of Contents (for versions 2013 and later) or Insert Table of Contents from the drop-down menu that appears (2010). A dialog box appears on the screen.
4. To change the tab leader that appears before the table of contents numbers, use the Tab leader drop-down menu to select a different leader.
5. Select the Modify option from the drop-down menu. Please keep in mind that if you have chosen a format other than From Template from the Formats drop-down menu, you will not be able to select the Modify option. A dialog box appears on the screen.
6. To format the first level of the table of contents, select TOC 1 and then Modify from the menu bar. After you've made your selection (such as font size or boldness), click the OK button to save your changes.
7. The remaining TOC levels should be completed at this point.
8. Press OK a number of times until you are returned to the document. A confirmation dialog box appears, requesting confirmation that the table of contents should be replaced with the new table of contents. Click on the OK button.
The following is an example of the Style dialog box that appears when you click Modify:
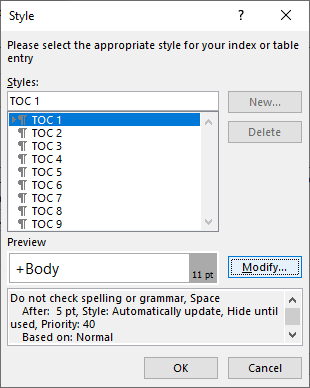
In the following dialog box, when you click the Modify button next to a TOC style, the following information is displayed:

Optionally, you can choose from the formatting options listed under Formatting, or you can click Format on the bottom left to access additional formatting options such as Font and Paragraph.
Step 4: Keep an up-to-date table of contents for your document
You can always make changes to the table of contents after you've finished editing your document.
To make changes to a table of contents, follow these steps:
1. Locate the appropriate chapter in the table of contents.
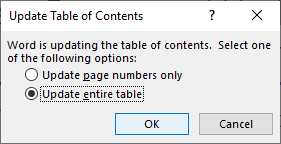
2. Select Update Field from the context menu of the right-click mouse button or press F9. In addition, you can select the References tab and then the Update Table of Contents button in the Table of Contents group from the References tab. A dialog box appears on the screen.
3. From the drop-down menu, select either Update page numbers only or Update entire table from the options (recommended).
4. Press the OK button to confirm your action.
Remove a table of contents from your document
When it is no longer necessary, you can remove the table of contents from your document.
To remove a table of contents from a document, follow these steps:
1. Locate the appropriate chapter in the table of contents.
2. Select the References tab, followed by the Table of Contents group, from the Ribbon menu bar. A drop-down menu appears on the screen.
3. Select Delete Table of Contents from the drop-down menu.
Additional options include dragging your cursor over the entire table of contents and pressing the Delete key to select the entire table of contents.
Given how easily a table of contents can be generated from built-in heading styles, it is recommended that you use the built-in styles rather than creating new heading styles when formatting your Word documents.

