
How To Delete Blank Rows From An Excel Spreadsheet? (5 Fast Ways To Remove Empty Rows)
1. Using the context menu to remove blank rows from the table
You can delete multiple contiguous blank rows by selecting them from the context menu:
1. Select the first row heading and then Shift-click the final row heading to begin. Drag the cursor across each row heading to begin.
2. Choose from the row headings using the right-click menu on your mouse. A drop-down menu appears on the screen.
3. Select the Delete option from the drop-down menu.
Delete multiple non-contiguous blank rows by selecting them from the context menu:
1. When selecting rows that are not adjacent, first click the heading of any adjacent rows and then Ctrl-click the headings of the remaining rows.
2. Choose from the row headings using the right-click menu on your mouse. A drop-down menu appears on the screen.
3. Select the Delete option from the drop-down menu.
2. Using a keyboard shortcut to remove blank rows from a spreadsheet
You can delete multiple contiguous blank rows by using the following keyboard shortcut:
1.Select the first row heading and then Shift-click the final row heading to begin. Drag the cursor across each row heading to begin.
2. To delete the rows that have been selected, press Ctrl + –. (minus sign at the top right of the keyboard).
3. Deleting any blank rows from the table by sorting
A straightforward method of removing blank rows is to arrange the data in such a way that blanks appear at the bottom of the table, where they can be ignored.
To remove empty rows from a table by sorting it, do the following:
1. Select the entire data set from your computer (not just the column you want to sort).
2. Select the Data tab from the Ribbon navigation bar.
3. Select Sort from the Sort & Filter drop-down menu. A dialog box appears on the screen. If you have a header row in your data, select My data has headers.
4. In the field or column containing the blanks you wish to remove, click Sort by and then the appropriate sorting option (for example, A-Z, smallest to largest, ascending or descending) to display blanks at bottom of data set.
5. Press the OK button to confirm your action. The blank rows in the data set will now appear at the bottom of the table and can be ignored.
The following screenshot depicts the Sort dialog box:

4. Using the Go to Special command, highlight and delete any blank rows in the table
Using the Go to Special function to eliminate blank rows from a collection of data is a great way to save time.
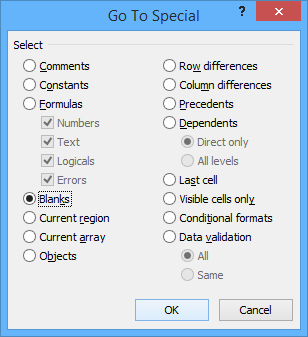
Within the Go to Special dialog box, you can choose from the following options:
Using the Go to Special command, you can locate and delete blank rows in the following ways:
1. To begin, choose a column that has no data in it (we're going to assume that the rest of the row is blank). For sensitive data above or below the list that you do not want to be deleted, you can select all cells in a column starting with the first cell and going all the way down (you could click in the first cell and Shift-click in the last cell).
2. Press the keys Ctrl + G at the same time. The "Go To" dialog box appears on the screen.
3. To access the Go to Special dialog box, select Special from the drop-down menu. Alternatively, you can select Go To Special from the Find & Select drop-down menu by selecting the Home tab in the Ribbon and then clicking the Specials button.
4. Click Blanks in the Go to Special dialog box and then OK to close the window. In the range you've selected, Excel will select all of the blank cells that are within the range you've selected.
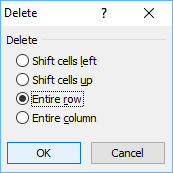
5. Right-click one of the blank cells you've selected and select Delete from the pop-up menu that appears. A dialog box appears on the screen.
6. Select the entire row from the drop-down menu.
7. Press the OK button to confirm your action.
Following the deletion of the file, the following dialog box appears:
Although the Find command can also be used to locate blanks, the Go to Special command is far more convenient in this situation.
5. Using filtering to delete blank rows from a table
Using filtering, you can also eliminate any blank rows from your table (traditionally called AutoFiltering).
Filter can be used to delete blank rows from a table.
1. Identify the cell range that contains all of the data in the data set by counting the number of cells in the range (including blank rows).
2. Select the Data tab from the Ribbon navigation bar.
3. Select Filter from the Sort & Filter group on the left. Alternately, you can use the Ctrl + Shift + L keyboard shortcut to quickly access the menu. In addition to the field names, arrows are displayed.
4. Select the empty cells in the rows you wish to delete by clicking the arrow next to the field name that contains the empty cells.
5. Deactivate or deselect Select All from the menu bar.
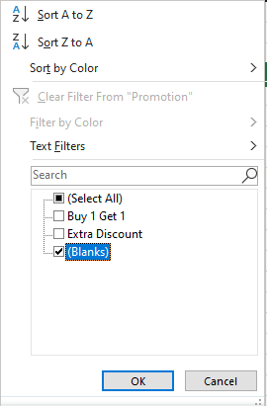
6. Select Blanks from the drop-down menu. Blanks will almost certainly be at the bottom of the page, so be prepared to scroll.
7. You can select the row headings of the filtered rows by clicking the first row heading and Shift-clicking the last row heading in the filtered rows.
8. Using the right-click menu, select one of the headings from the drop-down list. A drop-down menu appears on the screen.
9. Select Delete Row from the drop-down menu.
10. From the Ribbon, select the Data tab, followed by the Sort & Filter group. 11. To remove the filtering, select Clear from the drop-down menu.
In the following example, the Promotion field has been filtered to only show blanks:
The list can now be sorted and filtered, and it can even be used to create pivot tables if desired.

